At ProfileTree, we have put together a series of WordPress tutorials for beginners. These tutorials are ideal for anyone who has little or no experience with WordPress.
Below is the first video within the WordPress tutorial series. It is a prologue video, which explains what the video series has to offer. As part of the WordPress tutorial project, we plan on giving you some tips and hints, tips on how to develop, create and manage your own WordPress website.
But first, what is WordPress? In short, WordPress is a web builder, ideal for building a website easily. There’re two different types of WordPress. These are WordPress.com and WordPress.org.
WordPress.org is the most commonly used of the two, as it has a lot more to offer. Although you will need to find your own hosting for your site. WordPress.com is a web builder more suited to the likes of blog sites. The tutorials within this series are only for WordPress.org.
To find out how to make a WordPress.com site, visit part one of our WordPress.com tutorials.
Table of Contents
Getting Started with Your WordPress Dashboard
Once you’ve got your WordPress set up, you will need to access the WordPress dashboard to start editing your site. To do this, you will need to have a domain linked up to your site.
To get to your dashboard, type your domain into the web address bar. Following your domain address, type in ‘/wp-admin’. An example would be ‘domain/wp-admin’. This also depends on your setup, but most of the time, you should be able to access your dashboard by this method.
Whenever you search for your site’s dashboard. You will be brought to an administration page. Here you will need to sign into your dashboard, using a username and a password that has already been setup.
Whenever you sign into your WordPress dashboard, it may look confusing at first.
Breaking Down the Dashboard
Whenever you first login to your WordPress dashboard, you will find a number of widgets. The main widget will be the ‘Welcome to WordPress!’ widget. Here, it will ask you to get started customising your site. It will also give you a few ideas on how to start cutomising your site. Another widget will ask to make a quick draft for a blog post. All these widgets allow you to get started with your site easily.
To the left of the screen, you will find all of the options available to you. Here you can change from the dashboard to many of the other options including posts, pages, the media of the site, plugins, the settings of your site and many others.
The video below shows the breakdown of the WordPress dashboard. It also shows how to use the settings of your WordPress site.
Working with the WordPress Settings
At ProfileTree we recommend heading to the settings of your site before development. To get to your settings, all you need to do, is head to the settings options to the left of your dashboard. When you click on settings, a list of settings will appear. These settings include general settings, writing, reading, discussion settings and many more.
Firstly go to the general settings. Within general settings, you can change the site title, the site tagline, the WordPress URL, Site Address URL, the main email and a few other general settings.
When any changes are made to the site, the email within the general settings will be notified.

How to Add New Media to Your WordPress Site
Uploading media to your WordPress site is very simple. On the left side of your WordPress window, you will find a list of options. Within these options is an option for media. When you click into the media, WordPress will being you to the library. This library will hold all your media files including images, audio, video, documents and more. Any media already on your site, will show here.
To add any new media, click on the ‘add new’ button. This will open a new window within your library to add files to. If you’ve got your files ready to upload, you can simply drag and drop the files to this window.
You can also click on, ‘select files’. Select files will open up your computer documents and you can choose which files to upload from here. Alternatively, if you hover over the ‘media’ button to the left, two options will appear. These options include the media library and add new. Click on add new to add files to your site this way.
When your documents are opened, you can choose a single file to upload or many files to upload at once. Once uploaded to your site, they’re stored on your sites server. Although we recommend to upload new images instead of re-using images over and over.
This could possibly hinder the SEO and previous setup of the images. We also recommend to only ever upload files that you know will be used. If the files aren’t being used, you can delete them easily within your media library. Also delete any duplicate images, if you know they’re not being used. Having files on your site takes up server and storage space on your website.
To delete a file, simply click on the file and the file details will appear. This includes the title and description of the file and also the alt tag for images. At the bottom of the details, there’re three options. ‘View attachment’, ‘edit more details’ and ‘delete permanently’ in red writing. Simply click on delete permanently and then ‘OK’, to delete permanently off your site.
Adding a New User to Your WordPress Site
Users is a very handy feature on WordPress. It is also very simple to add a new user. When you first create a site, it will have an admin user. You can edit this user by heading to users on the left side of the window and going to the ‘Your Profile’ option. Alternatively you can edit the user by going to ‘all users’ and clicking on the user you wish to edit.
Within the profile, you can edit the name of the user. The username, unfortunately can’t be changed. You can also edit contact options such as email, their own website and other contact details such as social media accounts. The email is important as it is used to log into your WordPress site and any notifications to do with your user profile will be sent here.
To add a new user, click on the ‘Add New’ option. This will bring you to the add new user window. When brought to the add new user window, you can enter the details of a new user. The details you need are, a username and an email address for the new user. Tick the box, so that the new user gets a notification about their account. Here you can also set a role for the new user. WordPress also sets a secure password for each new user, but you can also change this within this window.
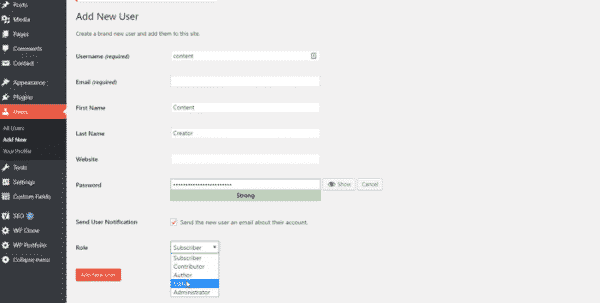
Setting a role is one of the most important features of a new user, other than their username and email. The role classifies how and what that user can access on the site. Roles include admin, editor, contributor, subscriber and author.
You can set a users role to an author. This means they have control over the content of the site. Another role is an editor. This role allows the user to edit the design of the site and can edit pages.
If you set a users role as admin, it means they can access the entire site. They have the ability to control the entire site, from the design to the tools and settings. They can install needed plugins for the site such as Yoast for SEO and many others.
Setting a user that is meant to be an author or editor, as an admin could be detrimental to a site as they could accidentally delete plugins or change certain settings. This means they can break the site and wouldn’t know how to fix it.
Conquering Content with Confidence: Unleashing the Power of the WordPress Dashboard
The WordPress Dashboard isn’t just a digital login screen; it’s your website’s command center, your content creation haven, and your plugin playground. Let’s delve into the treasure trove of benefits it offers, explore efficiency hacks for a streamlined experience, and transform you into a dashboard-wielding website warrior!
Benefits: Your Website at Your Fingertips
- Information Arsenal: No more hunting for stats! The Dashboard displays vital information like page views, visitor insights, and comments, keeping you in the loop about your website’s performance.
- Content Creation Castle: Craft compelling content with ease. From writing blog posts to managing pages, the Dashboard provides a user-friendly interface for composing, scheduling, and publishing your masterpieces.
- Plugin Powerhouse: Expand your website’s capabilities with a click! Browse and install plugins for SEO optimization, social media integration, or contact form management, all from the comfort of the Dashboard.
- Customization Kingdom: Make the Dashboard your own! Rearrange widgets, hide unwanted elements, and create custom menus to tailor the interface to your workflow and preferences.
- Collaboration Corner: Manage user roles and permissions for team projects. Assign editor or contributor roles to colleagues, empowering them to create and edit content while maintaining control.
Efficiency Hacks: Supercharge Your Dashboard Experience
- Keyboard Shortcut Samurai: Master keyboard shortcuts for lightning-fast actions. Publish posts, edit pages, and navigate menus with just a few keystrokes, boosting your productivity.
- Widget Whiz: Utilize widgets strategically. Add quick access to frequently used features like drafts, comments, or recent posts to keep your workflow flowing smoothly.
- Plugin Maestro: Optimize your plugin portfolio. Regularly review installed plugins, disable inactive ones, and update regularly to ensure smooth performance and security.
- Search Sensei: Don’t waste time scrolling. Utilize the handy search bar to quickly find specific pages, posts, or settings within the Dashboard, saving you precious minutes.
- Mobile Master: Manage your website on the go! Take advantage of the WordPress mobile app or responsive web interface to create content, moderate comments, and stay connected to your website even while away from your desk.
Remember: Mastering the WordPress Dashboard is a journey, not a destination. Experiment, personalize, and embrace the constant learning curve. With these tips as your guide, you’ll navigate the Dashboard with confidence, transform content creation into a breeze, and unleash the full potential of your website!
Solutions for Everyday Challenges and Hidden Gems for Power Users
The WordPress Dashboard, while powerful, isn’t devoid of thorns. Let’s tackle some common challenges and unveil hidden features that unlock the full potential of your website!
Challenges and Solutions:
- Navigation Woes: Feeling lost in the menu maze? Utilize the search bar, personalize the layout with frequently used tools, and consider exploring alternative Dashboard plugins for a more intuitive interface.
- Confusing Menus: Unclear options and jargon can be daunting. Read documentation, research tutorials, and seek help from online communities to demystify menus and functionalities.
- Security Jitters: Keeping your website safe is paramount. Use strong passwords, regularly update WordPress and plugins, and invest in reputable security plugins to fortify your digital fortress.
Advanced Features for Power Users:
- User Roles and Permissions: Delegate tasks and manage access by creating custom user roles. Assign “editor” or “contributor” roles to team members, ensuring collaboration without compromising control.
- Custom Post Types: Go beyond standard posts and pages. Create custom post types for products, events, or testimonials, adding flexibility and structure to your website content.
- Bulk Actions: Save time with batch editing. Utilize bulk actions to update multiple posts, delete comments, or install plugins, streamlining your website management tasks.
Mobile-Friendly Dashboard:
Manage your website on the go! The WordPress mobile app and responsive web interface allow you to:
- Create and edit content: Craft blog posts, update pages, and schedule publications right from your smartphone.
- Moderate comments: Stay on top of audience engagement by responding to comments and managing discussions even while away from your computer.
- Track website performance: Monitor key metrics like page views, visitor insights, and engagement statistics, keeping your finger on the pulse of your website’s health.
Baby Steps in the Big League: A Beginner’s Guide to the WordPress Dashboard
Congratulations on entering the exciting world of WordPress! But before you tackle complex plugins and SEO strategies, let’s conquer the first frontier: the WordPress Dashboard. Fear not, fledgling website warriors, for this beginner’s guide will equip you with the knowledge and confidence to navigate the Dashboard like a pro!
Dashboard Demystified:
Imagine the Dashboard as your website’s control center. Here you’ll find everything you need to create, manage, and publish your content. Don’t be intimidated by all the buttons and menus; we’ll break it down for you:
- Home: Think of this as your main hub. It displays basic stats like recent comments, pages, and posts.
- Posts: This is where you write blog articles, news updates, or any text-based content for your website.
- Pages: For static content like “About Us” or “Contact,” head to the Pages section.
- Media: Images, videos, and documents live here. Upload and manage your multimedia content with ease.
- Appearance: Customize your website’s look and feel through themes and widgets. Think of it as your website’s wardrobe!
- Plugins: Enhance your website’s functionality with plugins for SEO, social media integration, or contact forms. Explore responsibly!
Taking the First Steps:
- Log in: Visit your website’s address followed by “/wp-admin.” Enter your username and password.
- Explore the Home: Familiarize yourself with the basic stats and links to key sections.
- Create your first post: Click on “Posts” and write your first blog article. Don’t worry about perfection, just have fun!
- Customize your look: Explore the “Appearance” section and choose a theme that suits your style.
- Connect with the community: Don’t hesitate to seek help online. WordPress forums and communities are filled with friendly experts who can answer your questions.
FAQ: Conquering Your WordPress Dashboard
Q: I’m completely new to WordPress. Where do I even start?
A: Start by familiarizing yourself with the Dashboard layout. Explore the sections covered in the beginner’s guide, starting with the Home screen and basic functionalities like creating posts and pages. Take it one step at a time, and don’t hesitate to use online resources or communities for help.
Q: The Dashboard seems overwhelming! How can I make it more user-friendly?
A: You can personalize the Dashboard layout! Hide unnecessary widgets, rearrange sections based on your preferences, and even explore alternative Dashboard plugins for a more intuitive interface. Remember, the Dashboard should work for you, not the other way around.
Q: Is using the WordPress mobile app safe?
A: Yes, the WordPress mobile app is a secure and convenient way to manage your website on the go. Just make sure you download the official app from your device’s app store and use strong passwords for additional security.
Q: I’m interested in Sean Connolly’s approach. Where can I learn more about his “Zen Dashboard”?
A: Check out Sean Connolly’s website or his book “The Confidence Code” for his insights on stress-free website management. You can also find interviews and articles online where he discusses his “Zen Dashboard” philosophy.
Conclusion: From Dashboard Novice to Website Warrior
The WordPress Dashboard might seem daunting at first, but with the right guidance and a dash of confidence, you can transform it into your creative playground and website management command center. Remember, you have the power to customize, explore, and unleash the full potential of your website. So, take your first steps, embrace the challenges, and watch your website flourish under your command. The world of WordPress awaits, and your Dashboard is the key to unlocking your digital dreams.
 ProfileTree

 Rahma Ali // 9th February 2024
 Marwa Alaa // 11th January 2024